Trello is a powerful tool for managing projects and tasks collaboratively. Gaining access and inviting users to your Trello boards is essential for seamless teamwork. This article guides you through the simple steps to invite team members and manage access efficiently, ensuring your projects stay organized and everyone stays on the same page.
Getting Started with Trello Access Setup
Creating a Trello account is hassle-free. Begin on the Trello homepage by clicking on the ‘Sign Up’ button. You can sign up with your Google account or by filling in your email and creating a password.
After successfully creating an account, you’ll land on the Trello dashboard. This is your command center for creating and managing Trello ‘boards’ – collaborative projects where you can assign tasks, track progress, and more. To create your first board, click the ‘+’ icon next to your profile picture and select ‘Create Board’. You can name your board, select a background, and start adding ‘lists’ or ‘cards’ – components of Trello where you record tasks.
Trello roles such as ‘Admins’, ‘Board Members’, and ‘Observers’ determine the level of access a user has to the board. ‘Admins’ have full edit and manage permissions. ‘Board Members’ can edit cards and comment but cannot alter the structure of the board. ‘Observers’ can only view the board and comments but cannot make edits. These roles help manage who can do what on the Trello platform, ensuring seamless collaboration.
Understanding these roles and navigating the dashboard efficiently is key to making the most out of Trello. In the next chapter, we will discuss how you can invite users to your Trello board and collaborate on projects effectively.
Inviting Users to Your Trello Board
Once you have set up your Trello board, the next step involves inviting colleagues or friends to join your project. Start by clicking on the board’s title in the dashboard section, and then select ‘Invite’ from the sidebar menu. A pop-up menu will appear with fields to enter the email addresses of those you wish to invite.
It’s recommended to add a personal message, explaining the purpose of the invitation, which will help ensure the invite is accepted promptly. In cases where email invitations are not feasible, consider generating an invitation link that can make the invitation process quicker.
When it comes to managing invitation permissions, you can assign roles like board member or observer when you send the invite. This early assignment helps in a smooth transition for new users as it defines what they can do straight away.
You can monitor who has accepted your invites by going to the ‘Members’ section found in the sidebar of your Trello board. Here, you will find a list of people who’ve accepted your invitations.
Some common issues you may encounter are invitations not being received or links not working. In these instances, it’s recommended to retry sending the invitation or generate a new invitation link.
To enhance security, ensure your invitees use strong passwords and activate two-factor authentication if available.
Keep in mind inviting users is just the beginning – the following chapter deals with managing user access and permissions for better collaboration.
Managing User Access and Permissions for Better Collaboration
Once users have joined your Trello board, it is crucial that you maintain control over their access and permissions. To adjust user access, navigate to ‘Menu’, then ‘More’, and, finally, ‘Settings’. There, you can manage user permissions.
Members can be grouped into subsets: admins, normal members, and observers. Admins can make key board changes, normal members can add, modify, and delete cards and lists, while observers can merely see the board’s content. To change a user’s role, select their name from the list of members and pick a new role from the drop-down menu.
Safety of your project’s data should be a priority. Restrict access only to people necessary for the project, and regularly review who has access. If a person no longer needs access, you can easily remove them by selecting their name, then choosing ‘Remove from Board’.
In scenarios such as a team member leaving the project, an easy solution could be to downgrade them to an observer, in case their insight might still be needed occasionally. This way, they can view the board, but can’t modify the content, protecting your board from unwanted changes.
Conclusions
Successfully gaining access and inviting the right users to your Trello boards simplifies project management and enhances collaboration. By understanding how to set up access, send invites, and manage permissions, you ensure smooth teamwork and secure project workflows. Follow these DIY steps to make the most of Trello’s collaborative features and keep your projects organized and on track.
Alternative Access with LinkMyAgency
Another approach involves using LinkMyAgency to streamline the access process:
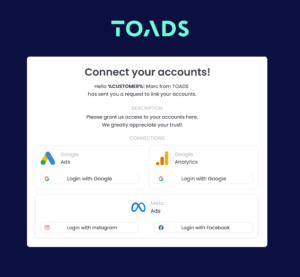
Send a Link: With LinkMyAgency, send a link to your client that allows them to easily grant you the necessary access without complex steps. No more frustration for either you explaining the steps, or your client not finding how to invite you.
Get Started with LinkMyAgency Sign up for a free 14-day trial in just a minute—no credit card required. Experience how LinkMyAgency can facilitate your agency operations, endorsed by industry giants like Meta, Google, and TikTok.