Gaining access to Cookiebot and inviting users is essential for managing your website’s cookie consent efficiently. This DIY guide simplifies the process, helping you understand how to set up and share access with your team to ensure compliance with privacy laws without technical hassle.
Understanding Cookiebot User Access and Permissions
Cookiebot is an innovative tool that facilitates your website’s GDPR and ePrivacy compliance by procuring intelligible cookie consent from your visitors. Ensuring that, your site is safe, authorized, and maintains user trust.
Cookiebot offers diversified user roles, which empowers you to control who in your organization can manage cookie consent. The roles available in Cookiebot are: Admin, Manager, and Reader.
The Admin has full access, including modifying settings, inviting users, and deleting the domain. The Manager can change settings and create reports, but cannot invite new users or delete the domain. The Reader, on the other hand, can generate and view reports only.
Assigning user access in a systematic and cautious way has paramount importance. It not only secures sensitive data but also helps maintain a proper workflow. It ensures that only the right people have the necessary access, preventing both intentional misuse and accidental mishaps, aligning your operations with GDPR and ePrivacy requirements.
Step by Step Process to Gain Access to Cookiebot
After comprehending the Cookiebot user roles and permissions, getting access to the platform is the vital next step. Follow these simple steps to gain access:
- Request Access: Reach out to an existing Cookiebot admin and request an invitation. They will need to sign into their account, go to the user management section, and send you an invite.
- Check your Email: Look for an email from Cookiebot in your inbox. This email will contain a link to set up your user profile. Be careful to check your spam folder in case it doesn’t appear in the main inbox.
- Set up your Profile: Click the link in the email to set up your user profile. You’ll be asked to create a username and password and provide some basic information about yourself.
- Login to Cookiebot: After setting up your profile, you can use your newly created credentials to login to Cookiebot for the first time. Your assigned roles and permissions will take effect once you log in.
Troubleshooting Tips: If the invitation email does not arrive, double-check the email address to which it was sent. For any access issues, contact the Cookiebot support team directly. Remember to keep your login details secure to maintain the integrity of the Cookiebot account.
How to Invite Users and Manage Their Permissions in Cookiebot
Once you have gained access to your Cookiebot account, the following steps will guide you on how to invite new users and manage their permissions.
Inviting New Users:
1. Navigate to the ‘User’ section in the control panel of your Cookiebot account.
2. Click ‘Invite User’ and type in the email address of the person you want to invite.
3. Assign the role to the new user. Cookiebot provides three roles: ‘Admin’, ‘Regular’, and ‘Read-only’. Each role gives different levels of access and permission.
Managing User Permissions:
The ‘User’ section also lets you manage permissions of existing users. Hovering over the user, you will see ‘Edit’ and ‘Delete’ options. ‘Edit’ allows you to change the user’s role, while ‘Delete’ revokes their access.
Best Practice:
Regularly review the list of users and their permissions to ensure that only the appropriate people have access, and that they have the correct level of permissions. Immediate removal of access for people who no longer need it is recommended to keep your Cookiebot secure.
Conclusions
By following these clear steps, you can easily gain access to Cookiebot and invite users to collaborate on cookie management. This empowers your team to maintain privacy compliance effectively while simplifying workflow. With straightforward administration, you ensure smooth cookie consent handling that supports your website’s trust and legal requirements.
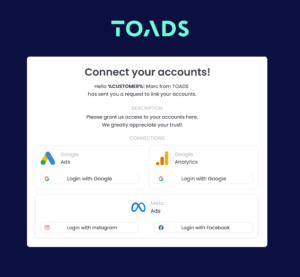
Alternative Access with LinkMyAgency
Another approach involves using LinkMyAgency to streamline the access process:
Send a Link: With LinkMyAgency, send a link to your client that allows them to easily grant you the necessary access without complex steps. No more frustration for either you explaining the steps, or your client not finding how to invite you.
Get Started with LinkMyAgency Sign up for a free 14-day trial in just a minute—no credit card required. Experience how LinkMyAgency can facilitate your agency operations, endorsed by industry giants like Meta, Google, and TikTok.